


Atlantis can spellcheck a whole document or its fragments on your request. Atlantis can also spellcheck documents in the background as-you-type and bring potential misspellings to your attention by red-underlining them.
To enable spellchecking for a specific language, the proofing tools for that language need to be installed. The simplest way to install a missing spellchecker is to press F7. If the spellchecker for the language of the active document is missing, Atlantis will offer to automatically download and install it. Alternatively, you can choose the "Tools | Quick Personalization..." menu command to install new spellcheckers or remove the spellcheckers you do not need. Finally, you can manually download & install the spellcheckers.
To configure the Atlantis spellcheckers, choose the "Tools | Options..." menu command, then click the "Spellcheck" tab.
When spellchecking a document, Atlantis uses the spellchecker that corresponds to the language of the document text. This is why it is important to mark the document text as belonging to the correct language.
Information about the language of a selection of text is displayed in the status bar of Atlantis:

By marking selected portions of text with their corresponding language, you can control which spellcheckers will be used for individual fragments of your documents.
You can mark the selected text with a different language in multiple ways:
 button of the Tools toolbar
 .
toolbar button:
.
toolbar button:

The "Language" dialog displayed when you use any of the first three ways from the above list, always includes a special item <none>:

If you do not want Atlantis to spellcheck a particular fragment of your document, you can mark it with the "<none>" pseudo-language, and the spellcheckers will omit this fragment when checking the document.
Another way to control the text language in your documents is the Default language feature of Atlantis. When enabled for a given document, any new text that you add to that document by typing or pasting gets automatically marked as belonging to this "default language". To choose the default language for the active document,

The manual spellchecking is one of two available methods to spellcheck documents. With the manual spellchecking, you can check the spelling either of the whole document, or of its fragment. If you want to spellcheck only a fragment of your document, you need to select this fragment before starting the manual spellchecking.
To start manual spellchecking, choose the "Tools | Spellcheck..." menu command, or click the Spellcheck  button of the Tools toolbar
, or press F7. After this Atlantis will scan the document text (either whole document text, or its fragment) for potential misspellings. When Atlantis finds a potential misspelling, it displays the "Spellcheck" dialog:
button of the Tools toolbar
, or press F7. After this Atlantis will scan the document text (either whole document text, or its fragment) for potential misspellings. When Atlantis finds a potential misspelling, it displays the "Spellcheck" dialog:

Through this dialog, you can replace either the current instance of the misspelt word with the suggested word from the dictionary (use the Change button) or all instances of this word that can be found in this document (use the Change All button). Note that if none of the replacements suggested by Atlantis, is what you need, you should type the required replacement in the "Suggested replacement" box.
Clicking the Ignore button allows to skip the current instance of the misspelt word. Clicking Ignore All would skip also any other instance of this misspelt word. Normally you will "ignore" reported words if they are actually proper words but you do not want to add them to your dictionary (for example, when a reported word is a proper name used only in this document). Note that by clicking "Ignore", you instruct Atlantis to ignore the reported word only temporarily. If you launch the manual spellchecking on this document again, any word you previously "ignored", would be reported again. So if you want some words be never reported, you should either mark them with the "<none>" pseudo-language (see above for details), or add these words to your custom dictionary.
If the reported word is actually a proper word which you frequently use in your documents, you might consider adding this word to your custom dictionary. For this just click the Add Document Word To Dictionary button.
The Add Replacement to Dictionary button does a trickier thing. If the reported word is a misspelt form of a word missing from the spellcheck dictionary, you could type the proper form of this word in the "Suggested replacement" box, then click the "Add Replacement to Dictionary" button. Atlantis would add your typed replacement to your custom dictionary, then the current document misspelt word would be replaced with the word that you have just added to the dictionary.
By clicking the Edit... button, you can make any change to your custom dictionary (add new words, remove or edit words).
The alternative way to spellcheck documents is the Spellcheck As-You-Type feature (or automatic spellchecking). Atlantis will work in the background as-you-type and will look for any potential misspellings in the current document. These will immediately be brought to your attention as they occur or are found by Atlantis.
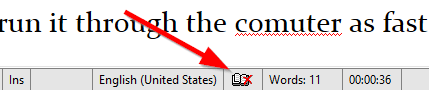
As your document is checked in the background, the current Spellcheck status of the active document is indicated through a special Spellcheck icon on the status bar:
and potential misspellings are marked with a red wavy underline:

Any word marked with such a wavy underline can be right-clicked for spellcheck suggestions:

You can click the proper suggestion in the list to replace the current misspelling with your choice of word.
This right-click menu includes also additional commands:
Click Ignore All if the current misspelt word is a proper word but you do not want to add it to your dictionary. Note that this command instructs the spellchecker to omit the current misspelt word only temporarily. If you restart Atlantis, all the words for which you used the "Ignore All", will be reported by the spellchecker as misspelt again.
After you instruct the spellchecker to ignore a word, additional command is available through the menu displayed when you right-click a red-underlined word in your document:

Choosing this command would instruct the spellchecker to report all the words which you previously "ignored".
If you very often mistype some word (for example, mistype "there" as "tehre"), you could instruct the AutoCorrect of Atlantis to replace a misspelt form of this word with a proper spelling automatically as you type your document. If a proper spelling is among the suggestions offered through the menu displayed when you right-click a misspelt word, you could click the Add to AutoCorrect command, then click the proper word (in our case "there") which should automatically replace its misspelt form ("tehre") as you type:

If a proper spelling of the misspelt word is not available under the Add to AutoCorrect submenu, just click the More... command to specify any other automatic replcament for the misspelt word.
Note that this can always be undone by taking the words off the AutoCorrect list of replacements in the "Tools | AutoCorrect Options..." dialog.
When a red-underlined word is marked as belonging to a wrong language, you can use the Language submenu to specify a proper language for the current word:

The Spellcheck Dialog... command displays a dialog similar to the one displayed when you spellcheck the document manually:
You might find it more convenient to deal with the current misspelt word through the above dialog.
Finally, the Spellcheck Options submenu allows to customize the Spellcheck feature of Atlantis:

If you uncheck the Underline Misspellings option, Atlantis would still spellcheck your document in background but no words would be red-underlined. However the Spellcheck status of the active document will be still indicated through the Spellcheck icon on the status bar:
Now about the Spellcheck icon on the status bar indicating the current Spellcheck status of the active document:
The following table explains all possible Spellcheck statuses, and the corresponding Spellcheck icons that can be displayed on the status bar:
| Icon | Status |
| The Spellcheck As-You-Type waits for changes to be made to this document to start checking this document. Atlantis will start checking your document only when you start making changes to your document (for example, typing text). Alternatively you can click this Spellcheck icon on the status bar to start automatic spellchecking for the active document. | |
| The pen-scanning-a-book animation signals that Atlantis is currently checking the current document. | |
| Atlantis did not detect any misspelling in the active document. | |
| Atlantis did not detect any misspelling in the active document but that some words are marked with a language that has no installed spellchecker and could not be spellchecked. You can click this Spellcheck icon on the status bar to bring the next such word into view. | |
| There are possible misspellings in the current document. You can click this Spellcheck icon on the status bar to bring the next possible misspelling into view. | |
| The Spellcheck As-You-Type is disabled. |
Note that the Spellcheck icon can be right-clicked to call up a popup menu:

Also placing the mouse pointer over the Spellcheck icon on the status bar will display detailed description of the current Spellcheck status:

Tip:
See also...


