


To add a new row to a table, hover the mouse cursor over the left edge of the table where you want to insert a new row:

A rectangular box with a "+" sign will automatically be displayed at that location:

Click it to insert a new row:

A new row can also be inserted before the first row:

And after the last row:

There is an alternative way to add new rows to tables. Right-click any row above or below which you want to insert new rows, and choose the "Insert | Rows Above" or "Insert | Rows Below" command from the popup menu.
If you select multiple rows in the table before calling the "Insert | Rows Above" or "Insert | Rows Below" command:

the "Insert | Rows Above" or "Insert | Rows Below" command will insert as many new rows above or below the selection as are contained within the original selection. Let's suppose that you have selected the first three rows of a table as illustrated right above. If you right-click and choose "Insert | Rows Below" from the menu, Atlantis will automatically insert the following three new rows:

To delete rows from a table, select them in any suitable way, right-click the selection, and choose the "Delete Rows" command from the popup menu.
To add a new column to a table, hover the mouse cursor over the top edge of the table where you want to insert a new column:

A rectangular box with a "+" sign will automatically be displayed at that location:

Click it to insert a new column:

A new column can also be inserted in front of the first column:

And after the last column:

When you insert new columns in this way, the existing columns do not get resized. The overall table width is instead increased by the width of the new column.
However, if you select columns before adding a new column, the overall table width will remain unchanged. Space for the new column is allocated by shrinking the selected column(s). Let's suppose that you have made the following column selection:

And you click to insert a new column between the 3rd and 4th columns:

The selected columns will be shrunk to provide space for the new column:

In the same way, if you select a whole table before inserting a new column:
And click to insert a new column:

All the table columns will be reduced to make space for the new column:

There is an alternative way to add new columns to tables: Right-click any column before or after which you want to insert a new column, then choose the "Insert | Columns to the Left" or "Insert | Columns to the Right" command from the popup menu.
If you select multiple columns before calling the "Insert | Columns to the Left" or "Insert | Columns to the Right" command:

the "Insert | Columns to the Left" or "Insert | Columns to the Right" command will insert as many new columns before or after the selection as are contained within the original selection. Let's suppose that you have selected the second and third column of a table as illustrated right above. If you right-click and choose "Insert | Columns to the Right" from the menu, Atlantis will automatically insert the following two new columns:

To delete columns from a table, select them in any suitable way, right-click the selection, then choose the "Delete Columns" command from the popup menu.
To insert a new cell in a table, right-click where you want to insert the new cell, then choose the "Insert | Cells..." command from the popup menu. In the "Insert Cells" dialog, choose where Atlantis should shift the existing cells, either to the right in the target row, or down the current column:

Let's suppose that you have the following table:

If you right-click the leftmost cell in the first row, then choose the "Insert | Cells..." command from the popup menu, and select the "Shift cells right" option, all the original cells of the first row will be shifted to the right:

If you choose the "Shift cells down" option instead, all the original cells of the first column will be shifted down, and a new row will automatically be created:

Now if you select multiple cells before calling the "Insert cells" command, and choose to "shift cells down", Atlantis will insert as many cells as have been selected. For example, let's suppose that you have made the following cell selection:

If you then run the "Insert cells" command, and choose to "shift cells down", Atlantis will create as many new cells as were originally selected, and create as many new rows as necessary to accommodate the shifted cells:

To delete a cell from a table, right-click the cell, then choose the "Delete Cells..." command from the popup menu. In the "Delete Cells" dialog, choose where Atlantis should shift the remaining cells, either to the left in the current row, or up in the current column:

Note that you can delete multiple cells at one go. To do so, select them in any suitable way, right-click the selection, and choose "Delete Cells..." from the menu.
To merge two or more cells belonging to different columns and/or rows into a single cell, you need to select these cells first:

Then right-click the selection, and choose the "Merge Cells" command from the popup menu. Atlantis will combine the selection into one single cell:

Note. When the selected cells are not blank:

their contents are incorporated into the new merged cell:

To split a cell into multiple columns and/or rows, right-click that cell, then choose the "Split Cells..." command from the popup menu. In the "Split Cells" dialog, choose how many columns and rows you want the split cell to have:

Let's suppose that you want to split the highlighted cell in this table:

If you right-click the selection and specify 3 columns and 2 rows in the "Split Cells" dialog, you will get this:

Note that you can split multiple cells at one go. To do so, select them in any suitable way, right-click the selection, and choose "Split Cells" from the menu.
Let's suppose that you want to split the highlighted cells in this table:

If you right-click the selection and specify 2 columns and 2 rows in the "Split Cells" dialog, you will get this:

Each selected cell got split into 2 columns and 2 rows.
Any table in an Atlantis document can be converted to ordinary non-table text.
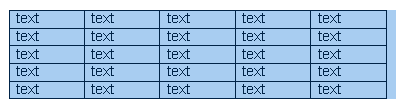
For example, you might need to convert a table into a structural list before feeding the table's data into another application that does not support proper tables. You might also want to convert a borderless table:

to an ordinary linear structure.
To do so, right click the table that you want to convert to text, and choose the "Convert Table to Text..." menu command:

This will display the "Convert Table to Text" dialog where you can specify which character Atlantis should use to separate cell text:
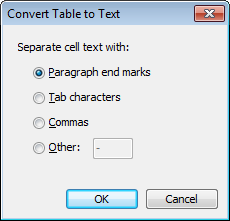
Clicking OK will remove the table structure:

See also...


