


The "Bullets" and "Numbering" toolbar buttons
The "Format | List" dialog and the List Gallery
The "Bullets & Numbers" popup toolbar
Here is the simplest way to start a new simple numbered list in Atlantis:
1. Type the first item of the target list manually:
1. This is the first item of my new list
Note that the typed item must be made up of the following combination:
"numbering text+period or closing bracket+space or tab character"
The numbering text itself has to be a list starting Arabic or Roman numeral (e.g. 1, 01 or I), or a Latin character (e.g. A, a). Uppercase and lowercase variants are allowed:
1. I. A. 1) I) A)
01. i. a. 01) i) a)
2. Press the Enter key.
As you know, when you press Enter in Atlantis, a new paragraph is automatically started. But in this case, more is happening. The Atlantis AutoCorrect will also remove any manually typed combination of "numbering text+period or closing bracket+space or tab character", and will format the newly-created paragraph as an automatic list:
1. This is the first item of my new list
2.
From then on, all you have to do is to press the Enter key whenever you want to add a new item to the list. The Atlantis AutoCorrect will take care of the numbering automatically:
1. This is the first item of my new list.
2. Second item.
3. Third item.
4. Fourth item.
5. Fifth item.
When you have finished typing the list, and do not want new items to be automatically added to it, all you need to do is to press the Enter key twice. The newly created paragraph will no longer be inserted as a list item. It will be inserted as any ordinary unlisted paragraph.
Tip: Here are other ways to unlist undesirable new list items:
a. Place the caret right after the automatic list text of the item. Press the Backspace key. The item will automatically be unlisted.
b. Click within the list item. Click the Bullets or the Numbering button to turn off either bullets or numbering.
c. Click within the list item. Select (no list) from the drop-down menu attached to the Bullets or to the Numbering button. You can also select (no list) from the List Gallery (Format | List... dialog).
New lists can be started anywhere in the document. Simply use the same combination each time: "numbering text+period or closing bracket+space or tab character", then add the text of the new list item and press Enter. A new list will automatically be created. And new items can be added with a single press on the Enter key. Pressing Enter twice stops the addition of new items to the list.
Now lists created in this way can be modified as easily.
Individual list items are removed if you delete the corresponding paragraph. The renumbering of the list is automatic.
New items can be added anywhere in the list. Simply place the insertion cursor where you want to insert a new list item, then press the Enter key. A new blank list item will automatically be created (see illustration above).
Note that you can even add new items above the first item of an existing list item. Here is how it is done:
Let's suppose that you have the following shopping list:
1. Apples
2. Sugar
3. Cinnamon
You want to add a new item as number 1 in the list.
First, place the insertion cursor right before the "A" of "Apples". Then press Enter. You will get this:
1.
2. Apples
3. Sugar
4. Cinnamon
You can now add any text after "1." and get a new list with proper numbering:
1. Flour
2. Apples
3. Sugar
4. Cinnamon
Very often list items follow each other in sequence as illustrated right above. However, list items can also be separated from previous list items by ordinary unlisted paragraphs. Let's take an example. Let's suppose that you create a new numbered list by typing "1. This is the first item of my new list". If you press the Enter key twice, the list is broken and an unlisted paragraph is created. You can then type any ordinary text.:

Now even though numbering was stopped, it is still possible to add further items to the above list. In other words, lists can easily be resumed where you left off. Here is how to proceed:
1. Place the insertion cursor at the end of the unlisted paragraph, then press the Enter key.
2. Type the following combination:
"Next list number+period+space+text of the new list item"
3. Press Enter.
The Atlantis AutoCorrect will automatically convert the newly-inserted paragraph to an item belonging to the same list. You can then carry on adding as many new items as are necessary. Simply press the Enter key to create any new item:
1. This is the first item of my new list
This paragraph is unlisted. It does not belong to any list. It does not have automatic list text.
2. Second item of the numbered list.
3.
Important: All these automatic list numbering or re-numbering changes will occur only if the Replace manual bulleting or numbering with automatic option is activated in the "Tools | AutoCorrect Options..." dialog.
With this option on, the creation and updating of numbered lists is automatic. But bulleted lists can also be created automatically in the same way. Here is how to create automatic bulleted lists:
1. Type the following combination:
"Asterisk character+space or tab character+text of the new list item"
For example, you could type:
* This is the first item of a new bulleted list
2. Press Enter
The Atlantis AutoCorrect will automatically format the newly-inserted paragraph as a bulleted list item:
![]() This is the first item of this new bulleted list
This is the first item of this new bulleted list
![]()
The bullet used for these automatically created list items will be the one assigned to the default bulleted list in the List Gallery (more about the List Gallery further down on this page).
Now there is an alternative way to create bulleted or numbered lists in Atlantis. You can use either the Bullets or the Numbering toolbar button:

All you have to do is select the paragraph(s) that you want to convert into list item(s), then click the appropriate toolbar button. As the name indicates, the Bullets button formats the target paragraph(s) as a bulleted list, the Numbering button formats the target paragraph(s) as a numbered list. Note that when you click these buttons directly, Atlantis uses the list characteristics defined as default in the List Gallery (please read on for details about the List Gallery). Also note that in the absence of a selection, the bulleted or numbered paragraph will be the one where Atlantis finds the insertion cursor.
Now both the Bullets and Numbering toolbar buttons have an attached drop-down panel (use the down arrow to the right of each button to display it).
The drop-down panel attached to the Bullets toolbar button displays all the bulleted list formats currently available from the List Gallery:

When you click any of the bullet types from this menu, Atlantis automatically formats the target paragraph(s) as a bulleted list with the corresponding design.
Choosing (No list) from the above menu removes all list formatting from the target paragraphs, converting them to ordinary unlisted paragraphs.
A "D" letter is always displayed in the top right corner of one of the items in this drop-down menu:

This "D" letter indicates that the corresponding bulleted list format is currently the default bulleted list format in the List Gallery. As we just saw, this default bulleted list format is automatically applied whenever you click the Bullets button directly without using its attached drop-down panel. This default bulleted list format is also used by the AutoCorrect of Atlantis when it converts paragraphs into bulleted lists.
The Numbering toolbar button works in a similar way. Its attached drop-down panel displays all the numbering list formats currently available from the List Gallery:

Here again, a "D" letter is always displayed in the top right corner of one of the items in this drop-down menu. This "D" letter indicates that the corresponding numbering list format is currently the default numbering list format in the List Gallery. This default numbering list format is automatically applied to the document selection whenever you click the Numbering button directly without selecting a particular list format from its attached drop-down panel.
When you use the Numbering toolbar button or its attached drop-down menu to format the target paragraphs as a list, Atlantis uses its heuristic algorithms to find out whether the paragraphs should be formatted as a new logical list, or should be incorporated in another similar list already present in the document. These algorithms should automatically produce proper results in the vast majority of ordinary cases. Even then you might exceptionally need to adjust the numbering that was automatically applied by Atlantis. We will deal with this topic later on.
There is a third way to create bulleted or numbered lists in Atlantis through direct formatting. You can use the Format | List... dialog. This is the most flexible and comprehensive way to apply direct list formatting to the target paragraph(s). The Format | List... dialog offers a much wider set of options than are available through the two direct list formatting methods already described above.
When the current selection or the insertion cursor are located within an unlisted paragraph and you click Format | List..., you bring up the List dialog in this way:

As you can see, the List dialog is divided into two main panels, top and bottom, each with a different function. These are two independent panels even though they can work in collaboration.
The top panel displays the list formatting characteristics of the current selection of paragraphs, or of the paragraph where the insertion cursor is located in the absence of a selection:
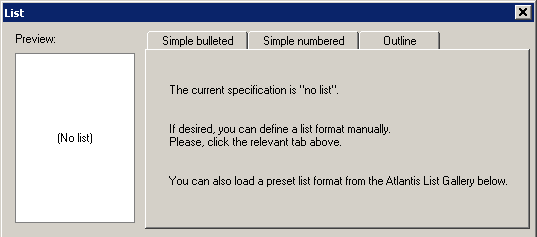
The bottom panel provides predefined list formats that can be loaded on the top panel to be used as ready-made list templates. The main provider of such predefined list formats is the List Gallery (later on, we will see that the bottom panel can also display style-controlled list formats already in use in the same or in other open documents):

Important!
The List Gallery behaves differently from similar galleries found in other word processors, and this in several ways:
1. The preset list formats (or list templates) available from the List Gallery are never automatically adjusted by Atlantis. Only users can customize the List Gallery and manually define tailor-made list formats.
2. The List Gallery also never displays the list formatting of the current document selection or any list formatting that might be present at the insertion point. In other words, the list formatting of actual documents is never reflected in the list templates of the List Gallery. List templates are only abstract ready-made models.
Consequently, changes made in the top panel of the List dialog in no way affect the list formats available from the List Gallery. And changes made to templates in the bottom panel (List Gallery) in no way affect the current document selection.
You might have either or both of the following two goals when you bring up the Format | List... dialog:
1. View or adjust the list formatting characteristics of the current selection of paragraphs (or those of the paragraph found at the insertion point).
2. Make changes to your List Gallery.
Both these tasks are done independently, from each separate panel:
You can adjust the list formatting characteristics defined in the top panel, then click OK to close the List dialog and apply the newly-defined list formatting characteristics to the current selection of paragraphs. Now if you have changed your mind and do not want to apply the list formatting characteristics displaying in the top panel, you need to click either the Cancel or Close button. Click OK only if you want to apply the list formatting characteristics defined in the top panel.
From the bottom panel, you can customize the list formats available from the List Gallery. Important: any change made to the List Gallery is automatically saved and will be kept until you modify things further. There is no need to click any extra button to save changes made to the List Gallery.
When changes have been made to the List Gallery, the caption of the Cancel button changes to Close in the List dialog. Click this Close button to close the List dialog and ignore any changes made in the top panel. As to the changes made to the List Gallery, they are automatically preserved.
As said above, the top and bottom panels work independently. But they also work in collaboration. Indeed there would be no use for the List Gallery if its templates could not be used to format lists in documents. Accordingly, there is a way to transfer information from the bottom to the top panel of the List dialog. To the right of the List Gallery is a special toolbar with all the related commands. The top command button is the Load button:

You will click this Load button to transfer the formatting characteristics of the template currently selected in the List Gallery from the bottom to the top panel. As seen above, the formatting characteristics loaded on the top panel are applied to the document selection if you click OK in this List dialog.
So if you want to format a selection of paragraphs using a list format from the List Gallery, you need first to load this format from the List Gallery to the top panel of the List dialog. As we have just seen, this is done through the Load button. But it can also be done with a simple double-click on the target list format in the List Gallery.
The loaded list format can be adjusted, if necessary. Then you can click OK at the bottom of the List dialog to apply the top panel list format to the document selection.
Now the transfer of information is also possible in the opposite direction, i.e. from the top to the bottom half of the List dialog. You will use this channel when you want to add the list format currently selected in the document window, or the one currently displaying in the top half of the List dialog to your List Gallery. Here is how to proceed :

In the future, when you open the List dialog again, you'll be able to select this list format, load it on the top panel like any other list format from your List Gallery and apply it to the current document selection from the top panel.
Besides the Add to List Gallery button, the List Gallery toolbar includes several other command buttons. You can edit or delete existing list templates, reorder them, create new ones manually, etc. You can also specify the default format for each of the three supported types of lists, i.e. simple bulleted, simple numbered, and outline. Read on for details on these different types of lists.
Let's now take a closer look at the top panel of the List dialog. On the left is displayed a schematic preview of the list format currently loaded on the top panel:

To the right of the preview and at the top of the dialog are 3 tabbed panes representing each a different type of lists. Atlantis supports simple bulleted, simple numbered, and outline lists:

All the bulleted and numbered lists used as examples further up are simple lists. Simple lists have all their items aligned on one single level. They have no sub-level (or logical sub-category). Accordingly, all the items belonging to a simple list have an identical bullet or numbering type.
On the other hand, Outline lists have a hierarchical structure and can have up to 9 different levels. Each level of that hierarchy can have its own design or formatting characteristics. Each paragraph or item from an outline list belongs to one of its 9 possible levels and displays accordingly. Each single level of an outline list can display either a bullet (behaving like a simple bulleted list) or a numbering text (behaving like a simple numbered list). Also each single level of an outline list can number in a different sequence. However, all the levels from an outline list belong to the same hierarchical structure and function as a whole. Different levels from an outline list can be closely interrelated and changes to one level very often will affect other levels.
Note that in practical terms outline lists generally have 5 or 6 levels at most. The human brain has difficulty following more complex hierarchical structures. Please bear this in mind when you design complex outline lists. Your readers will only be grateful for it.
Here is a basic example of an outline list with 4 levels:
Part I. Level 1
Chapter 1 Level 2
Section 1 Level 3
Sub-Section 1 Level 4
Sub-Section 2 Level 4
Section 2 Level 3
Chapter 2 Level 2
Part II. Level 1
Chapter 1 Level 2
Chapter 2 Level 2
Etc.
So to design a list format from scratch, you must first select the appropriate type by clicking one of the 3 tabs in the Format | List... dialog, then adjust the characteristics of the list as you like.
With Simple bulleted lists, the two main characteristics that can be adjusted are those controlling the look of the bullet itself:

The bullet can be either
1. a symbol character from a font,
2. or a picture from a graphic file.
The current bullet type is changed by clicking either the Symbol... or the Picture... button in the Simple Bulleted pane (marked with a red border on the above screen capture).
Note that only a few word processors support picture bullets (bullets from graphic files). If compatibility with other word processors is a concern, we recommend that you only use symbol bullets because these are supported by nearly all modern word processors. Also note that picture bullets normally mean bigger document files. So if compatibility or size are a concern, use symbol bullets preferentially.
When you have selected a symbol or picture for the bullet, you can adjust the look of the bullet even further. Symbol bullets can have any of the traditional font attributes (bold, italic, font size, etc). Press the Font Properties... button to customize the font attributes of the symbol used for the bullet. Press the Picture Size... button if you want to specify a particular size for the current picture bullet:

Normally bullets have variable size. Their size is automatically adjusted so that they match up with the paragraph font size. But you can also choose a fixed size for your picture bullets if it suits your requirements better.
You can also specify which character Atlantis will automatically insert right after the bullet itself. Bullets can be followed by a tab or space character. No character at all is also a possibility. Default is "tab":

Finally, all list formats include information about indents of the corresponding paragraphs:

Use the available spin boxes to specify suitable values for these indents. Any change in these values will automatically be reflected in the Preview box on the left of the List dialog. You will immediately see how the target list would look if you kept the current indent values.
Options for the Simple numbered lists are a little more complex:

First, you must specify a format for the number in the Number style box. Default is "1, 2, 3...":

But as already mentioned further up, the automatic list text displayed by items in a numbered list normally includes not only numbers themselves but also accompanying text and/or punctuation signs. The Text box in the Simple Numbered pane can be used to specify such an accompanying text. For example, besides the numbers themselves, the list items of a numbered list could display "Item #" as an accompanying text, as shown on the following screen capture:

We have seen that you can specify the font properties of the automatic list text, the follow-up character, and the paragraph indents of simple bulleted lists. The same options are available for simple numbered lists:

However, simple numbered lists have a few extra options not available for bulleted lists. You can specify the list starting value:

Start at values other than "1" (or "A", "a", "I", "i", etc) are normally used whenever the current list is a continuation of a list already started in another document (e.g. when the current document is an addendum to another document). But Start at values other than "1" can also be used to design more complex numbering schemes within the same document (interrelated lists).
You can also specify different alignments for the automatic list text of numbered lists. As illustrated in the next screen capture, 3 different alignments are available from the Number (...)-aligned at drop-down box. Default is left-aligned:

List numbers are aligned in relation to the paragraph first line indent.
Note that first line indents are displayed on the horizontal ruler in the document window:

Here is how list items with different numbering alignments look in documents:

Now about outline lists. They are more complex to set up than simple bulleted or numbered lists. First and foremost, you must choose which level of the outline list you want to deal with:

Then, as we saw, each level can be either bulleted or numbered. The switch between level types (bullets or numbers) is done using the two Level type radio buttons at the top of the Outline pane:

When the bulleted type is selected for a level in an outline list, the set of options is the same as that available for simple bulleted lists. However, keep in mind that these options are meant only for the level currently selected in the outline:

Similarly, when the numbered type is selected for a level in an outline list, the basic set of options is the same as that available for simple numbered lists. Again, bear in mind that these options are meant only for the level currently selected in the outline:

But there are extra options available for outline lists.
From level 2 onwards, you can choose to display not only the numbering text of the current level, but also the numbering text(s) of any of the previous levels. The Insert level number box is meant exactly for this purpose. Use its pull-down menu to add the numbering text of previous levels to the automatic list text of the current level. Numbers are automatically inserted at the current caret position in the Text box right above:

This is a most convenient way to customize the automatic list text used for each level. The Insert level number pull-down menu displays the different levels each with a different color. The same color code is used to display the corresponding numbers in the Text box right above:

Another special option in the Outline pane is only available from level 2 onwards. It is the Restart after higher level option:

When this option is on (it is on by default), and a lower level paragraph is inserted after a paragraph from a higher level, the list numbering sequence of the lower level paragraph is automatically broken, and its numbering is restarted back at the value defined for the Start at option (e.g. "1", "I", "A", "a", etc, as a general rule).
Here is an example where the numbering of the lower level paragraphs is systematically restarted after a higher level (the Restart after higher level option is on):

On the other hand, here is an example where the numbering of the lower level paragraphs is continuous through higher levels (the Restart after higher level option is off):

Now as you might know, legal documents traditionally use Arabic numerals alone for the numbering of their paragraphs. Here is a schematic example of so-called "legal style numbering":
SECTION 1.0
1.1 Sub-Section
1.2 Sub-Section
(1) Item
(2) Item
1.3 Sub-Section
(1) Item
(2) Item
(3) Item
1.4 Sub-Section
(1) Item
(2) Item
SECTION 2.0
2.1 Sub-Section
2.2 Sub-Section
SECTION 3.0
1.1 Sub-Section
(1) Item
(2) Item
1.2 Sub-Section
1.3 Sub-Section
(1) Item
(2) Item
(3) Item
Atlantis provides a special option so that "legal style numbering" is automatic when you set up any level of an outline list. For this you only need to activate the Legal style numbering option on the Outline pane. When this option is checked, the automatic list text of the current level is automatically converted into Arabic notation. For example, if you have previously defined "I.1" as the numbering text for a level, and you activate the Legal style numbering option, Atlantis will automatically change "I.1" to "1.1" (Arabic numerals are substituted for their Roman counterpart):

A few words about the various list format previews displayed by Atlantis. When you have set up a complex outline list with many levels, the list preview might not show all of the list levels. In this case, you can get a bigger preview of the list by placing the mouse pointer over the original preview. A Full preview icon button will automatically pop up:
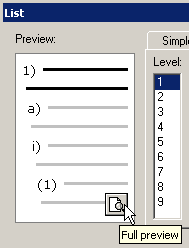
Click this Full preview icon button to display a full preview of the current outline list:

As we have seen, each item (each paragraph) of an outline list belongs to a specific level of the list. At times, you might want to assign a list item to a higher level, or to a lower level. Traditionally, these 2 special operations are called "Promote list item" and "Demote list item". Atlantis offers multiple ways to perform these operations. They will be mentioned further down on this page.
Atlantis has a special toolbar dedicated to Bullets & Numbers. The Bullets & Numbers toolbar offers a very convenient way to manage both bulleted and numbered lists with the mouse. This special toolbar is displayed by placing the mouse pointer over the target bullet or number. The original arrow pointer will automatically change into a special pointer showing a list symbol:

If you left-click when this special list pointer is displaying, the target bullet or number will be selected, and the Bullets & Numbers toolbar will pop up:

Various operations can be performed on the selected bullet, using the buttons on this toolbar. You can change, remove, resize the bullet symbol or picture. You can bring up the List dialog and change the list formatting characteristics of the entire list. You can promote/demote items if the current list is outline. Etc.
Instead of selecting a single bullet, you can select multiple bullets and apply the commands available on the Bullets & Numbers toolbar to all of them simultaneously.
There are several ways to select multiple bullets:
1. Double-click the target bullet to select the whole list level if the list is outline, or the whole list if the list is simple.
2. Triple-click the target bullet to select a whole outline list.
3. Individual bullets can be selected (or deselected) one by one if you hold the Ctrl key down while you click each one of them in turn.
4. If you select a fragment of document in a traditional way, then click a single bullet within the selection, all the bullets in the selection will automatically be selected.
All the items of a list (all the paragraphs belonging to the same list) not only share some list formatting but also behave as a whole, as a logical sequence of items. A document may contain multiple lists using identical list formatting but each one of these lists is still a completely separate group of items with its own internal logic. Let's take an example. Here are three independent lists of items, each belonging to a different category of things:
1. Apple
2. Pear
3. Orange
4. Plum
5. Peach
1. Black
2. Yellow
3. Red
4. Green
5. White
1. Poland
2. Italy
3. Uganda
4. Australia
5. Brazil
The first lists names of fruits, the second colors, the third country names.
All three lists are designed in the same way. They have identical list formatting: they use Arabic numbers followed by a period and a space character. But they are still different lists. They are numbered independently of each other.
So a list in a document is not just a group of paragraphs that share list formatting characteristics. As shown above, items with identical list formatting can still belong to different lists. Understanding this is vital whenever you design complex list numbering schemes.
Atlantis includes a special tool for the management of lists: the Lists panel of the Control Board. With the Lists panel, you can control both the list formatting of individual paragraphs and the arrangement of logical lists in the wider document. It shows schematic previews of all the logical lists available in the current document:

But you can also use the toolbar at the bottom of the Lists panel to perform various operations on any of the lists present in the active document.
One of the main purposes of the Lists panel is to help you browse the document lists with the greatest of ease. On the Lists panel, you can see how many and where logical lists are included in the document, and which items (which paragraphs) belong to each list. You can also double-click a list preview on the Lists panel to automatically bring up the corresponding list in the document window and highlight all its items as a multiple selection. For example, the following paragraphs were selected after double-clicking a list preview in the Lists panel:

At the top of the Lists panel is a pull-down box with a menu allowing you to display only a particular type of list, or all the lists:

The Lists panel toolbar includes button commands to
1. format the current document selection as a new logical list with its own individual list formatting,
2. include the document selection in the list currently highlighted on the Lists panel,
3. convert the highlighted list to unlisted text,
4. etc:

Another purpose of the Lists panel is to help you understand why list items are sometimes numbered wrongly in documents with complex list schemes, and above all to help you fix these numbering problems. One of the most common numbering problem is what is called "spaghetti numbering". Different logical lists from the same document sometimes get intertwined. Items belonging to one logical list end up being numbered in a sequence belonging to another logical list. Here is an example of "spaghetti numbering":
1. Apple
2. Pear
3. Orange
1. Plum
4. Peach
2. Black
3. Yellow
4. Red
5. Green
6. White
In the first logical list (fruit list), the fourth item ("Plum") is obviously breaking the natural numbering sequence by being numbered as a number "1" item. The "Peach" item has number "4" but should have number "5".
In the second logical list (color list), the first item has number "2" as starting number.
Obviously something is wrong in the numbering of these 2 lists. This arose because the "Plum" item got wrongly numbered as an item from the second logical list (the color list).
The numbering of these 2 lists needs fixing. This is where the Lists panel comes in very handy. If you double-click the Lists panel preview of the second list (the "colors" list), Atlantis will automatically highlight all the items that are currently registered as belonging to this second list:

In the above example, "Plum" must obviously be re-included in the first list and re-numbered accordingly. This is done with only one mouse click, using the Lists panel. Here is how this is done:
1. First select the "Plum" item in the document window:

As is apparent on the Lists panel on the left, the "Plum" item is still registered with the second list.
2. Click the List 1 preview on the Lists panel to select it. It is automatically highlighted (marked with a blue border). It is obviously the list that you want "Plum" to be registered with. The Lists panel should now look like so:

You have now selected the proper list preview for the item selected in the document window.
3. On the toolbar, click Include document selection in the list highlighted above:

Here is how the 2 lists should now look:

As you can see, Atlantis automatically registered "Plum" with the first list and re-numbered its items accordingly. What's more, the second list was also automatically re-numbered since it had lost its wrong number "1" (the "Plum" item) and "Black" got its rightful number back.
So the Lists panel has 3 main uses:
1. All the lists present in a document are conveniently displayed on a single panel. You can easily manage them from the Lists panel itself (you can reformat, convert to unlisted text, etc).
2. You can easily identify any numbering problem, or other. This is possible because you are always in a position to determine which document items have been registered with the wrong list.
3. As we just demonstrated, you can easily fix any problem.
Note that list numbering problems should occur only exceptionally with lists created in Atlantis. But if you have documents created in other software that have list numbering problems, open these documents in Atlantis, and use the Lists panel to fix them.
Let's suppose that you have created a list with fruit names:
1. Apple
2. Pear
3. Orange
4. Plum
5. Peach
Let's suppose that you now want to start a new list with color names. If you press the Enter key, Atlantis will automatically assume that you want to add a sixth item to the fruit list:

This is obviously not an appropriate starting number for a new list. No problem! There is an easy way to fix this. Simply click the list number "6" in the document window. The "Bullets & Numbers" toolbar will automatically pop up. Click its Start new list button:

"6" will automatically be replaced with "1" so that you can start adding items to the new list without affecting the numbering of the previous fruit list:
1. Apple
2. Pear
3. Orange
4. Plum
5. Peach
1. Black
Etc.
Now let's suppose that you have 2 different lists (the fruit and color list) in sequence:
1. Apple
2. Pear
3. Orange
4. Plum
5. Peach
1. Black
2. Yellow
3. Red
4. Green
5. White
Let's also suppose that you want to fuse these 2 lists so that all items (fruits and colors) share the same continuous numbering. All you need to do is click "1" in the second list (first color name) to display the "Bullets & Numbers" toolbar. Click its Resume previous list button:
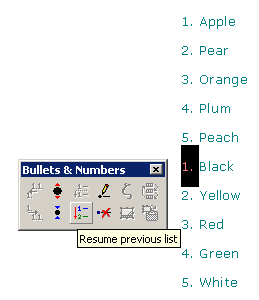
Here is the resulting list:
1. Apple
2. Pear
3. Orange
4. Plum
5. Peach
6. Black
7. Yellow
8. Red
9. Green
10. White
Note that the Start new list and Resume previous list commands are also available from the list right-click menu:

See also...


