


As you might know, a style includes formatting characteristics that are used by all the paragraphs formatted with it. When a style includes list formatting characteristics and it is applied to a paragraph, the target paragraph is automatically included in the list controlled by the style.
Let's suppose that you want all the paragraphs associated with a style to be bulleted or numbered. Here is one way to do it:
1. Bring up the Format | Style... dialog.
2. Select the target style (the Heading 1 style in our example)
3. Press the Modify button to display the Edit Style dialog, and press the List... button:

to open the List dialog:

5. Use any of the suggested ways in this List dialog to adjust the list formatting characteristics of the current style.
As can be seen on the above screen capture, when you access the List dialog in connection to a style which currently includes no list formatting properties, the dialog top panel includes instructions on possible ways to specify a list format for the style. Note that this dialog is similar to the dialog displayed by the Format | List... menu command. But it has a number of additional options.
When you have specified suitable list formatting properties for the style, the list preview on the left of the top panel includes indication that the displayed list format is associated with that style:

6. OK out of the List dialog, and close all the other style-related dialogs that you previously opened. You'll see that all the paragraphs associated with the Heading 1 style have been automatically formatted as separate items from the same list:

As already mentioned, Atlantis does not allow a mix of style-controlled list formatting and direct list formatting. This is an absolute rule with Atlantis. You will not be allowed to change the list formatting characteristics of a style-controlled list directly in the document window. Instead, you must modify the list formatting characteristics of the associated style itself. Style-controlled lists are controlled by styles exclusively. Nothing else will do.
In concrete terms, if the style associated with a paragraph includes list formatting properties, you will not be able to modify or remove the list formatting characteristics of that paragraph except through the Format | Style... dialog. For example, if you tried to apply a different bulleted or numbered list format to a Heading 1 paragraph from the document displayed on the above screen capture, you would get the following message:

Now, you may ask: "Why use styles to create and control lists?"
First, because, as you know, styles empower you to make sweeping changes across the whole of a document. When you modify a style, you modify all the associated paragraphs at one go. With direct list formatting, you'd need to modify each paragraph separately.
But there is more. With style-controlled lists, the list formatting possibilities are almost endless, much more than direct formatting will ever allow. In the above illustration, the list format was controlled by a single style (Heading 1). But in Atlantis, multiple styles can control the formatting characteristics of the same list, so that each such style can be used to highlight items of the same target list with a different design.
Let's take the above example a little further. Let's suppose that we'd like to set off (highlight) some of our document headings in a special way, with red font color for example. We can create a new style with adequate formatting properties. Let's call it Special Heading. We can then use it to format the headings that we want to highlight in a special way:

We now need to make adjustments so that any paragraph formatted with the Special Heading style is also included in the list already controlled by the Heading 1 style. This is done in the following way:
1. Bring up the Format | Style... dialog.
2. Click Special Heading in the Styles box on the left to make it the current style.
3. Press the Modify button to display the Edit Style dialog.
4. Press the List button in the Edit Style dialog. The List dialog will display in the following way:

As can be seen in the above screen capture, when Atlantis is dealing with style controlled lists, the bottom panel of the List dialog not only includes list formats from the List Gallery, but it also includes another tabbed panel displaying all the Style-controlled list formats already in use in the current document.
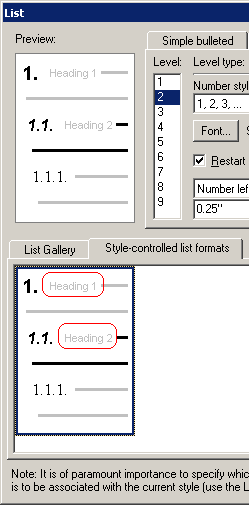
5. Let's click the Style-controlled list formats tab to see which list formats are currently style-controlled:

In this particular example, our document includes only one list format controlled by the Heading 1 style, as shown in the list preview.
6. We now want to associate the Special Heading style with the same list format. First, let's click the target list format to select it:

7. On the right of the Style-controlled list formats panel, we can now use the top button to "associate the target style (i.e. the Special Heading style) with the highlighted list format".
When this is done, Atlantis will display a message warning you that the current list format is now controlled by two styles, the Heading 1 and the Special Heading styles. And that you have to dissociate any (or both) of these 2 styles from the list format that they control if you want to change this:

The fact that the current list format can now be controlled by any of the two associated styles (Heading 1 and Special Heading) is shown by the captions in the list preview:

Consequently, items from this same list can be formatted either with the Heading 1 or Special Heading style, depending on their intended design. But even though these items might be formatted differently (with a different style), they still belong to the same list (both styles are associated with the same list) and will be numbered accordingly (in sequence).
8. Let's now close all the style-related dialogs to apply all changes and go back to the document window. Here is how our document now looks:

The paragraphs have different color depending on whether they are associated with the Heading 1 or Special Heading style, but they are included in the same list and are part of the same numbering sequence.
Now style-controlled outline lists typically make use of multiple styles. If we associate the same outline list with the Heading 1 and Heading 2 styles, we can set up the most widely used numbering scheme for outline lists:

Note that the above numbering scheme was achieved by associating the Heading 1 and Heading 2 styles each with a different level of the same outline list. As can be seen on the following screen capture, the Heading 1 style was associated with Level 1 of the outline list. The Heading 2 style was associated with Level 2 of the same outline list:
See also...


